Developing Apps with EnerGyan
This section deals with developing and deploying apps locally on EnerGyan.
What is an app?
When people hear the word ‘app’, most think of a sophisticated iOS/Android application for phones. We are here to change that mindset. For us, an app is a piece of software than can perform a task(s). It can be something as simple as a Python script with few lines of code which sends you an alert when your energy consumption crosses a threshold. While this might seem simple (and it is), its a valuable feature to have when you’re battery is running low or your solar panel is not producing enough energy.
Where should you run your app?

- You can deploy your app on a computer (connected to the same network as EnerGyan)
- You can deploy your app on EnerGyan
When should you deploy your app on the computer?
- Your app does offline analysis
- It is computationally intensive
- Your app is UI (user interface) based and needs a large monitor, keyboard etc.
- Note: You can also run online apps if you have a dedicated computer
When should you run your app on EnerGyan?
- App has to run continuously (24*7)
- It it computationally less intensive
- App is latency sensitive
Before you start
Make sure you are authorized to access EnerGyan
You should get necessary permissions and training before you proceed.
Accessing EnerGyan
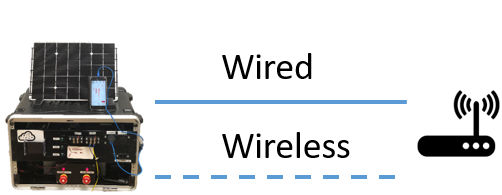
EnerGyan can be accessed through a web browser(wired or wireless),
They can also be accessed through SSH (wired or wireless). The boards are password protected. Talk to the admin/manufacturer for these details.
Making sure EnerGyan is running
Make sure the EnerGyan platform is up and running. The easiest way is to check the touch-display and see if it displays the default screen as shown below.

Connect EnerGyan to your network
Connect EnerGyan hardware module to your network (wired or wireless)
- For wired connection, connect EnerGyan to your router through an Ethernet cable.
- For wireless connection, use the touch display (on EnerGyan) to connect it to your WiFi.
Connecting to EnerGyan
To communicate with EnerGyan, make sure your computing device is on the same network as EnerGyan (or use VPN)
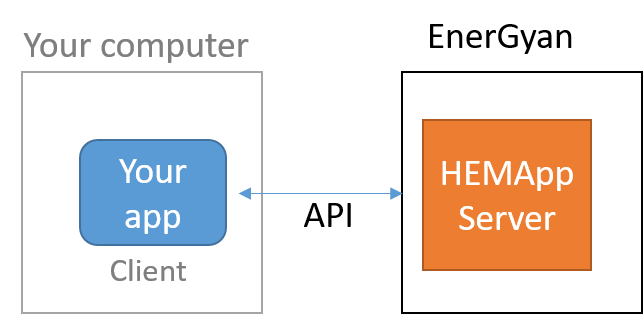
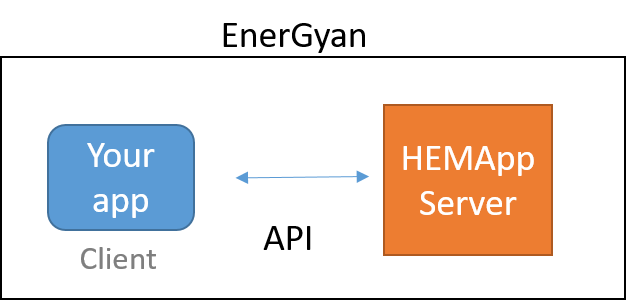
Communicating with EnerGyan
EnerGyan has an internal computer which runs a UDP server. This means your app (deployed on EnerGyan or on your computer) which acts as a UDP client can request data from this server and also send requests to turn on/off nodes. Here is a quick tutorial on UDP.
Your app (which is the UDP client) can be written in any language.
EnerGyan tool kit abstracts communication between UDP server and client so that you don’t have to worry about UDP communication. However, at this point the toolkit only supports Python.
Note: You can use our API with any computer language
Python
If your app is Python based, we got you covered. See Downloading the EnerGyan ToolKit. This toolkit abstracts all the communication between your app and the EnerGyan server.
Running the app on EnerGyan
Connect to EnerGyan
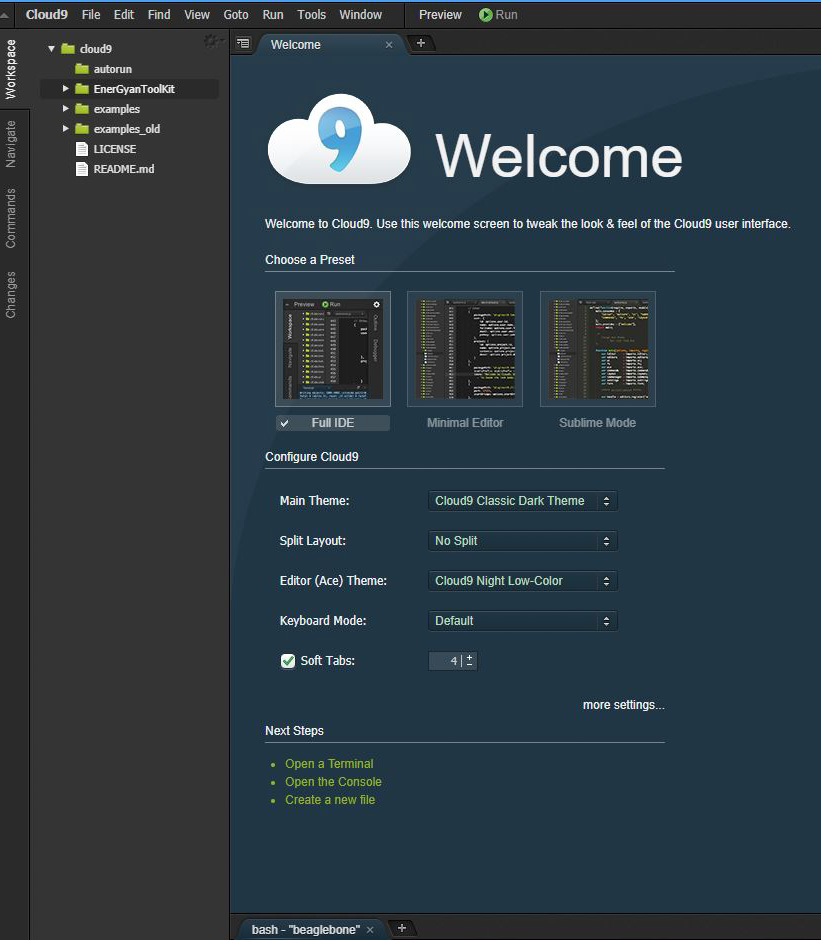
As long as you’re on the same network as EnerGyan, you can connect to it through a wired or a wireless connection. The IP of EnerGyan will be displayed on the touch screen. Connect to it from browser. For example if EnerGyan’s IP is 192.168.1.159, enter the following in your browser
http://192.168.1.159:3000/ide.html
This opens up an online editor for developing and running your energy application.
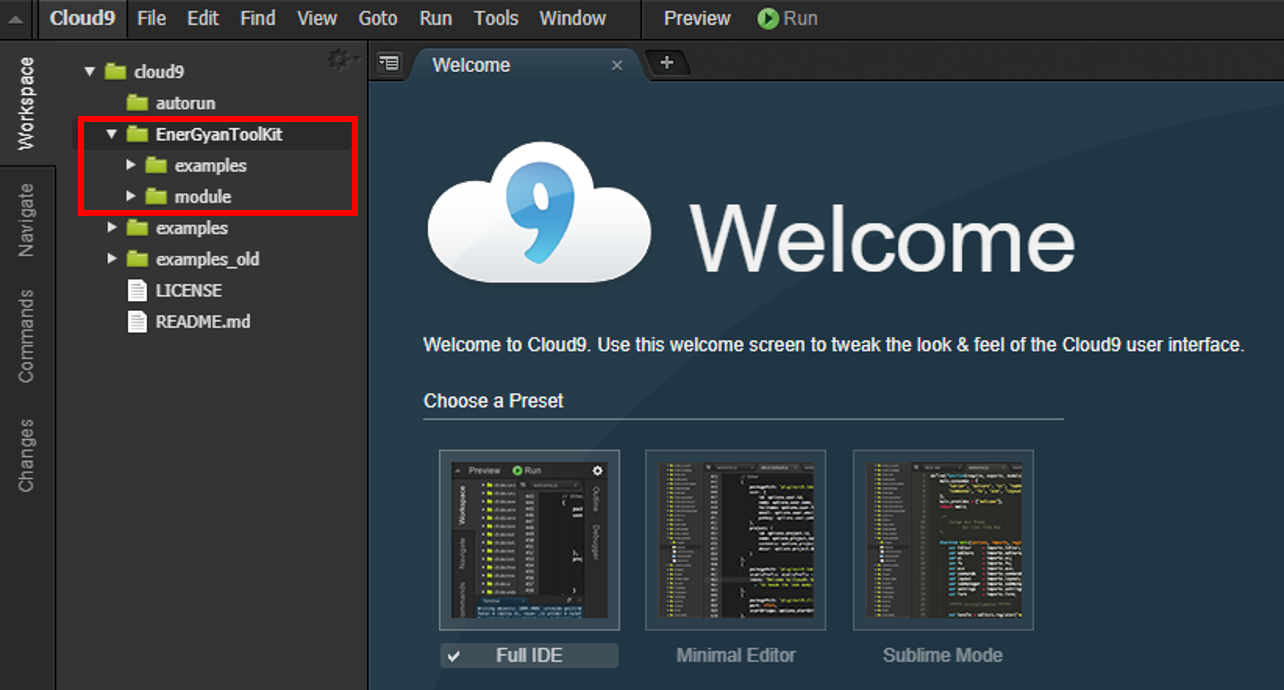
Navigating to the EnerGyan toolkit
Running the app (on EnerGyan)
EnerGyan comes preloaded with the EnerGyanToolKit.
On the online editor, select EnerGyanToolKit. It has two sub-directories - module and examples.
module- contains modules necessary to create and run an app.examples- contains sample apps. examples/bare.py is a skeleton app that you can build on.
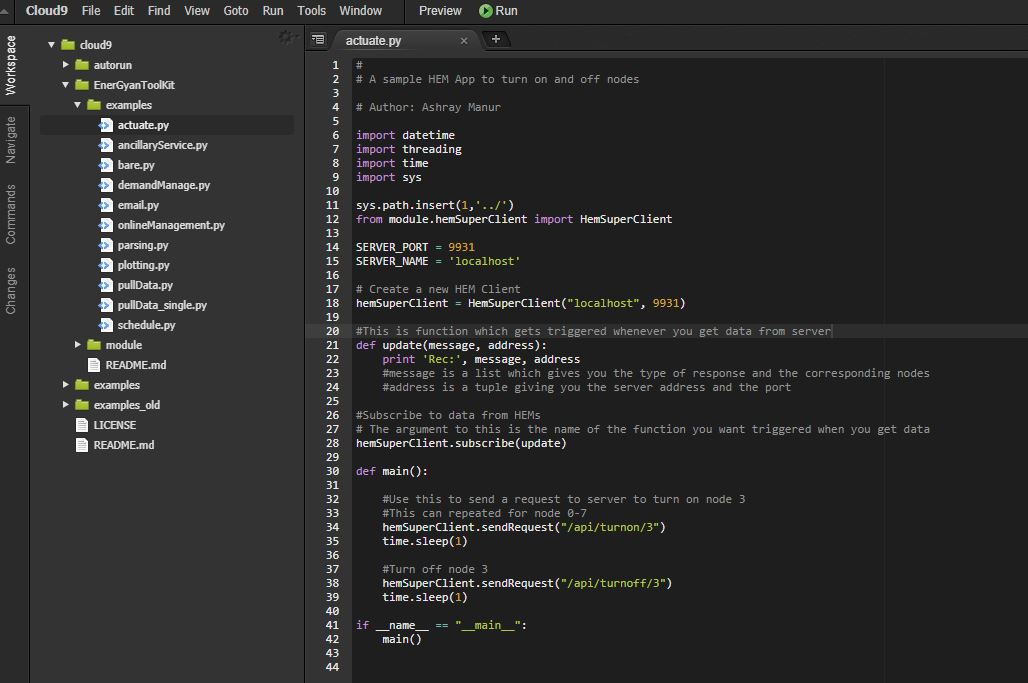
Let’s run a sample app
In the examples directory, select actuate.py. You should see the screen below.
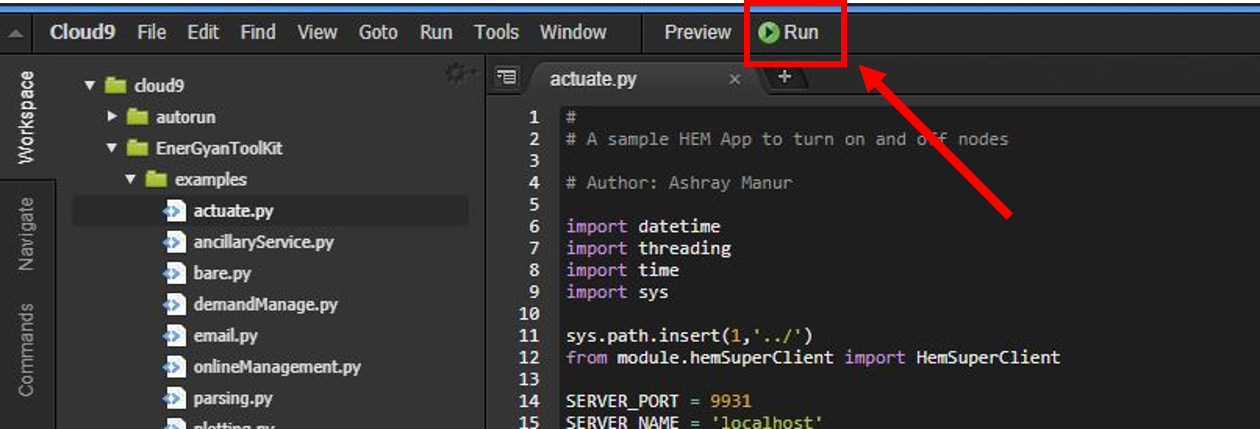
Now, click on Run
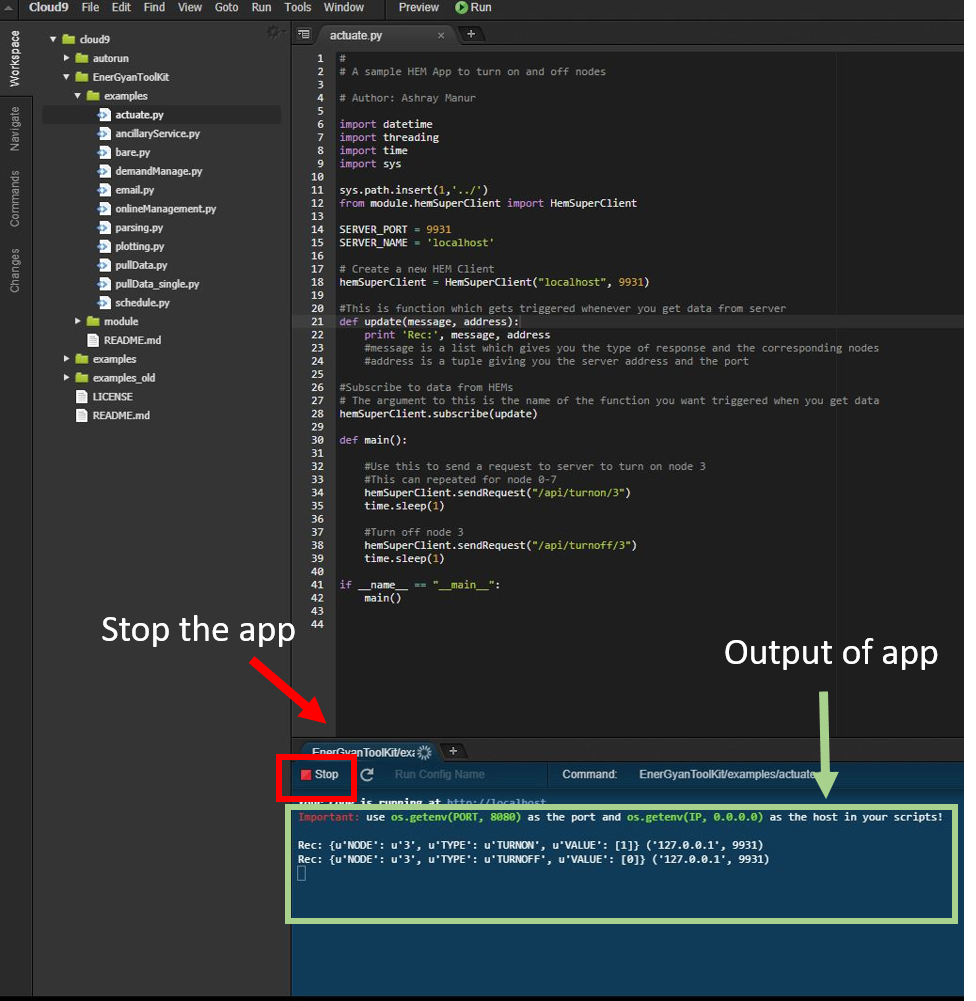
To stop your app, click on the Stop button located at the bottom of the editor. The picture below shows the output area of your app. The output of any print statements will be displayed here.
Running your app continuously
If you want your app to run in the background, just close the browser after you click on Run
Running the app on your computer
To run the app on your computer, you need to download the EnerGyan Tool Kit.
Downloading the EnerGyan ToolKit
Go to https://gitlab.com/seup/EnerGyanToolKit
Fork the repository
Here is the guide from GitLab - https://docs.gitlab.com/ce/gitlab-basics/fork-project.html
Clone the fork you created
git clone PASTE_YOUR_SSH_OR_HTTPS_PROJECT_NAME_HERE
Understanding development tool kit directory structure
In EnerGyanToolKit
module- contains hem modules necessary to create an app. Copy this folder to your directory when creating your app.examples- contains sample apps
Creating your first app
You can use bare.py as a starting point. It has all the boiler plate code you need for an energy app.
Sample apps included
Here is a list
pullData.py- Pull node(all) data from HEMApp Server through APIpullData_single.py- Pull single node data from HEMApp Server through APIactuate.py- Turn on/off nodes through APIdemandManage.py- Perform load management when power consumption crosses thresholdemail.py- Send an email from your appdemandManage_email.py- Send an email from your app when you do load management
Running a sample app
Let’s run an app which turns on/off a particular node on HEM
Check server address
If you’re running this app on your computer or a different EnerGyan (which is different from where you’re pulling the data), change the SERVER_NAME to the local ip address.
If your app has to run in the background, use nohup
nohup python actuate.py &
Stopping your app
Get the process id (pid) of your app process
ps aux | grep actuate
The output of this looks something like this
user 70413 0.0 0.1 110404 9804 pts/8 Sl 13:33 0:00 python actuate.py
The pid in this case is 70413
pid is the number listed in the PID column for your app
Now kill that process
pkill -9 <pid>
In this case, it would be something like
pkill -9 70413
Creating a pull request
If you find any bugs, you can create pull requests.
Here are two tutorials
- https://docs.gitlab.com/ee/gitlab-basics/add-merge-request.html
- https://www.digitalocean.com/community/tutorials/how-to-create-a-pull-request-on-github - this is for GitHub but can be applied to GitLab
Skeleton app
Let’s look at a skeleton app that can be used as a starting point for app development
Open bare.py in examples to follow along with the rest of the section
#
# bare.py
# Skeleton app that can be used for app deployments

# Author: Ashray Manur

import datetime
import threading
import time

sys.path.insert(1,'../')

import module.hemParsingData
from module.hemSuperClient import HemSuperClient

hemSuperClient = HemSuperClient("192.168.1.236", 9931)

def update(message, address):
        print 'Rec:', message, address
        #{'NODE': 'ALL', 'TYPE': 'DCPOWER', 'VALUE': [0.185, 5.9, 85.6, 10.4, 0, 0, 0, 12.5]} ('192.168.1.236', 9931)

hemSuperClient.subscribe(update)

def main():

        while(1):

                hemSuperClient.sendRequest("api/getdcpower/all")
                time.sleep(5)

if __name__ == "__main__":
    main()
The sections below are explaining the various components of the app framework using bare.py
as an example
Importing Modules
Import your standard python modules
import datetime
import threading
import time
Import hem modules
sys.path.insert(1,'../')

from module.hemSuperClient import HemSuperClient
import module.hemParsingData
import module.hemEmail
Note: there might be other standard or custom modules that you might need to import based on what you’re doing
sys.path.insert(1,'../') is used to define the path to indicate the location of the modules. Change this depending on your directory structure.
Defining a trigger function
def update(message, address):
        print 'Rec:', message, address
This functions gets triggered every time your app gets a message from the EnerGyan server.
It takes two arguments message and address. When it is triggered, the actual data gets stored in message
and the address of the server responding to your request gets stored in response
Creating a new Client
This client is used to communicate with EnerGyan. The EnerGyan runs a server(called HEMApp server) to which you can send requests and receive responses This client abstracts the communication to make data communication between your app and the server easier.
#Creates a new HEM client to talk to the server
hemSuperClient = HemSuperClient("192.168.1.236", 9931)
If your app is running on EnerGyan computer, change the IP address to “localhost”
The port is fixed at 9931
Defining multiple Clients
Not included in bare.py
In case your app is communicating with many EnerGyans
hemSuperClient1 = HemSuperClient('localhost', 9931)
hemSuperClient2 = HemSuperClient('192.168.1.28', 9931)
hemSuperClient3 = HemSuperClient('192.168.1.29, 9931)
You can request data from all these servers as along as they are in the same network
Subscribing to updates
After you define your trigger function and the HEM client, you need to subscribe to updates. This ensures that whenever you get a response from HEM. This can be done by
hemSuperClient.subscribe(update)
The argument to this function is the name of the trigger function.
Understanding response data from server
Whenever data is sent from the server, the trigger function gets called and it gives you two values
message and address.
message contains the response to the request you made
address contains the details of the server making that response
message is a dictionary (key:value) and address is a tuple
print 'Rec:', message, address
A sample message is as follows. This response if for a request of power data for all nodes in HEM
{'NODE': 'ALL', 'TYPE': 'DCPOWER', 'VALUE': [0.185, 5.9, 85.6, 10.4, 0, 0, 0, 12.5]}
To extract the value:
message['VALUE']
The output would be
[0.185, 5.9, 85.6, 10.4, 0, 0, 0, 12.5]
To extract the node corresponding to this value
message['NODE']
The output would be
ALL
There is usually one key:value per request
API
API general format
/api/<action>/<node-number>
Actions can be
- Turn on/off
- Get electrical data
- Send messages
Node numbers usually go from 0-7
How to use the API
hemSuperClient.sendRequest(apiRequest)
Sample request
hemSuperClient.sendRequest("api/getdcpower/0")
Sample response
#message
{'NODE': '1', 'TYPE': 'DCPOWER', 'VALUE': [45.7]}
EnerGyan DC Systems
This section is for EnerGyan DC.
Turn off nodes
Format
/api/turnoff/<node-number>
Sample
/api/turnoff/3
Sample response
#message
{'NODE': '3', 'TYPE': 'TURNON', 'VALUE': [0]}
For ‘VALUE’ 1 means ON and 0 means OFF
Turn on nodes
Format
/api/turnon/<node-number>
Sample
/api/turnon/1
Sample response
#message
{'NODE': '1', 'TYPE': 'TURNON', 'VALUE': [1]}
For ‘VALUE’ 1 means ON and 0 means OFF
Status of single node
Format
/api/getnodestatus/<node-number>
Sample
/api/getnodestatus/1
Sample response
#message
{'NODE': '1', 'TYPE': 'STATUS', 'VALUE': [1]}
For ‘VALUE’ 1 means ON and 0 means OFF
Status for all nodes
Format
/api/getnodestatus/all
Sample response
#responseData
{'NODE': 'ALL', 'TYPE': 'STATUS', 'VALUE': [0,0,0,1,1,1,0,1]}
0 is off and 1 is on
DC voltage for single node
Format
/api/getdcvoltage/<node-number>
Sample
/api/getdcvoltage/3
Sample response
#message
{'NODE': '3', 'TYPE': 'DCVOLT', 'VALUE': [14.2]}
The value is in Volts
DC voltage values for all nodes
Format
/api/getdcvoltage/all
Sample response
#message
{'NODE': 'ALL', 'TYPE': 'DCVOLT', 'VALUE': [13.625, 13.6, 13.625, 13.4, 13.7, 13.8, 13.6, 13.6]}
The value is in Volts
DC current for single node
Format
/api/getdccurrent/<node-number>
Sample
/api/getdccurrent/4
Sample response
#message
{'NODE': '4', 'TYPE': 'DCCURRENT', 'VALUE': [1.88375]}
The value is in Amps
DC current values for all nodes
Format
/api/getdccurrent/all
Sample response
#message
{'NODE': 'ALL', 'TYPE': 'DCCURRENT', 'VALUE': [1.6, 1.2, 0, 0.4, 3.7, 1.8, 1.3, 3.6]}
The value is in Amps
DC power for single node
Format
/api/getdcpower/<node-number>
Sample
/api/getdcpower/5
Sample response
#message
{'NODE': '5', 'TYPE': 'DCPOWER', 'VALUE': [26.74925]}
The value is in Watts
DC power values for all nodes
Format
/api/getdcpower/all
Sample response
#message
{'NODE': 'ALL', 'TYPE': 'DCPOWER', 'VALUE': [0.185, 0.185, 5.3,0,0,0,0,0]}
The value is in Watts
DC energy for single node
Format
/api/getdcenergy/<node-number>
Sample
/api/getdcenergy/1
Sample response
#message
{'NODE': '1', 'TYPE': 'DCENERGY', 'VALUE': [2252428.391018]}
The value is in Joules. You can convert it to Wh
DC energy values for all nodes
Format
/api/getdcenergy/all
Sample response
#message
{'NODE': 'ALL', 'TYPE': 'DCENERGY', 'VALUE': [29.21, 16.688, 13.5,3.52,0,0,0.3358,0]}
The value is in Joules. You can convert that to Wh
DC charge for single node
Format
/api/getdccharge/<node-number>
Sample
/api/getdccharge/0
Sample response
#message
{'NODE': '0', 'TYPE': 'DCCHARGE', 'VALUE': [170782.33881]}
The value is in Coulombs
DC charge values for all nodes
Format
/api/getdccharge/all
Sample response
#responseData
{'NODE': 'ALL', 'TYPE': 'DCCHARGE', 'VALUE': [8779.87, 5014.19, 4066.334, 1040.689,0.000328,0.000328,15.080517,0]}
The value is in Coulombs
EnerGyan AC Systems
This section is for EnerGyan AC.
Turn off nodes
Format
/api/turnoff/<node-number>
Sample
/api/turnoff/3
Sample response
#message
{'NODE': '3', 'TYPE': 'TURNON', 'VALUE': [0]}
For ‘VALUE’ 1 means ON and 0 means OFF
Turn on nodes
Format
/api/turnon/<node-number>
Sample
/api/turnon/1
Sample response
#message
{'NODE': '1', 'TYPE': 'TURNON', 'VALUE': [1]}
For ‘VALUE’ 1 means ON and 0 means OFF
Status of single node
Format
/api/getnodestatus/<node-number>
Sample
/api/getnodestatus/1
Sample response
#message
{'NODE': '1', 'TYPE': 'STATUS', 'VALUE': [1]}
For ‘VALUE’ 1 means ON and 0 means OFF
Status for all nodes
Format
/api/getnodestatus/all
Sample response
#responseData
{'NODE': 'ALL', 'TYPE': 'STATUS', 'VALUE': [0,0,0,1,1,1,0,1]}
For ‘VALUE’ 1 means ON and 0 means OFF
AC voltage for single node
Format
api/getacvoltage/<node-number>
Sample
/api/getacvoltage/0
Sample response
#message
{'NODE': '0', 'TYPE': 'ACVOLT', 'VALUE': [115.717569]}
This is the RMS voltage and is in Volts
AC voltage for all nodes
Format
/api/getacvoltage/all
Sample response
#message
{'NODE': 'ALL', 'TYPE': 'ACVOLT', 'VALUE': [115.82487, 115.82487, 115.82487, 115.82487, 115.82487, 115.82487]}
This is the RMS voltage and is in Volts
AC current for single node
Format
/api/getdcenergy/<node-number>
Sample
/api/getaccurrent/0
Sample response
#message
{'NODE': '0', 'TYPE': 'ACCURRENT', 'VALUE': [0.339167]}
This is the RMS current and is in Amps
AC current for all nodes
Format
/api/getaccurrent/all
Sample response
#message
{'NODE': 'ALL', 'TYPE': 'ACCURRENT', 'VALUE': [0.339141, 0.304396, 0.009357, 0.005452, 0.003518, 0.003526]}
This is the RMS current and is in Amps
AC active power for single node
Format
api/getacpoweractive/<node-number>
Sample
api/getacpoweractive/0
Sample response
#message
{'NODE': '0', 'TYPE': 'ACPOWERACTIVE', 'VALUE': [39.164083]}
AC active power for all nodes
Format
/api/getacpoweractive/all
Sample response
#message
{'NODE': 'ALL', 'TYPE': 'ACPOWERACTIVE', 'VALUE': [39.127099, 34.572928, 0, 0, 0, 0]}
AC reactive power for single node
Format
/api/getacpowerreactive/<node-number>
Sample
api/getacpowerreactive/0
Sample response
#message
{'NODE': '0', 'TYPE': 'ACPOWERREACTIVE', 'VALUE': [-0.74302]}
AC reactive power for all nodes
Format
/api/getacpowerreactive/all
Sample response
#message
{'NODE': 'ALL', 'TYPE': 'ACPOWERREACTIVE', 'VALUE': [-0.744076, -5.766048, 0, 0, 0, 0]}}
AC active energy for single node
Format
/api/getacenergyactive/all
Sample
api/getacenergyactive/0
Sample response
#message
{'NODE': '0', 'TYPE': 'ACENERGYACTIVE', 'VALUE': [0.034566]}
AC active energy for all nodes
Format
/api/getdcenergy/all
Sample response
#message
{'NODE': 'ALL', 'TYPE': 'ACENERGYACTIVE', 'VALUE': [0.034648, 0.030616, 0, 0, 0, 0]}
AC reactive energy for single node
Format
api/getacenergyreactive/<node-number>
Sample
api/getacenergyreactive/0
Sample response
#message
{'NODE': '0', 'TYPE': 'ACENERGYREACTIVE', 'VALUE': [-0.000741]}
AC reactive energy for all nodes
Format
api/getacenergyreactive/all
Sample response
#message
{u'NODE': u'ALL', u'TYPE': u'ACENERGYREACTIVE', u'VALUE': [-0.000658, -0.005185, 0, 0, 0, 0]}
AC frequency for single node
Format
api/getacfrequency/<node-number>
Sample
api/getacfrequency/0
Sample response
#message
{'NODE': '0', 'TYPE': 'ACFREQUENCY', 'VALUE': [59.967205]}
AC frequency for all nodes
Format
api/getacfrequency/all
Sample response
#message
{'NODE': 'ALL', 'TYPE': 'ACFREQUENCY', 'VALUE': [59.967205, 59.967205, 59.967205, 59.967205, 59.967205, 59.967205, 0, 0]}
AC angle for single node
Format
"api/getacangle/<node-number>"
Sample
api/getacangle/0
Sample response
#message
{'NODE': '0', 'TYPE': 'ACANGLE', 'VALUE': [-0.815625]}
AC angle for all nodes
Format
api/getacangle/all
Sample response
#message
{'NODE': 'ALL', 'TYPE': 'ACANGLE', 'VALUE': [-0.73125, -9.50625, -21.65625, -27.5625, 68.428125, -11.025]}
AC power factor for single node
Format
/api/getacangle/<node-number>
Sample
api/getacangle/0
Sample response
#message
{'NODE': '0', 'TYPE': 'ACPF', 'VALUE': [0.999797]}
AC power factor for all nodes
Format
api/getacangle/all
Sample response
#message
{'NODE': 'ALL', 'TYPE': 'ACPF', 'VALUE': [0.999797, 0.985777, 0.924442, 0.27144, 0.364928, 0.012272]}
Modules
This section deals with the important modules that you can use to build your app.
These can be found in SeupAppKit/module
hemSuperClient.py
This module is used to communicate with the server
You can import it with
from module.hemSuperClient import HemSuperClient
Check out pullData.py to learn how to use it.
hemEmail.py
This module is used to send email with the server
You can import it with
import module.hemEmail
Check out email.py to learn how to use it
hemParsingData.py
This module parses data from HEM data dump to extract electrical and node data
You can import with
import module.hemParsingData
Check out parsing.py to learn how to use it
Tutorials
Understanding the HEM data dump
HEMApp (the core software which runs HEM) dumps all the electrical data (voltage, current, power etc. ) on the microSD card on the processor. The file is data.csv and is located at /media/card
Here are few lines from data.csv
VOLT:13.65,NODE:0,DATE:12/8/17-2:28:40
VOLT:13.62,NODE:1,DATE:12/8/17-2:28:40
VOLT:13.65,NODE:2,DATE:12/8/17-2:28:40
VOLT:13.62,NODE:3,DATE:12/8/17-2:28:40
VOLT:13.65,NODE:4,DATE:12/8/17-2:28:40
VOLT:13.65,NODE:5,DATE:12/8/17-2:28:40
VOLT:13.62,NODE:6,DATE:12/8/17-2:28:40
VOLT:13.62,NODE:7,DATE:12/8/17-2:28:40
AMP:0.00,NODE:0,DATE:12/8/17-2:28:40
AMP:0.00,NODE:1,DATE:12/8/17-2:28:40
AMP:0.00,NODE:2,DATE:12/8/17-2:28:40
AMP:0.00,NODE:3,DATE:12/8/17-2:28:40
AMP:0.00,NODE:4,DATE:12/8/17-2:28:40
AMP:0.00,NODE:5,DATE:12/8/17-2:28:40
AMP:0.00,NODE:6,DATE:12/8/17-2:28:40
AMP:0.00,NODE:7,DATE:12/8/17-2:28:40
POW:1.00,NODE:0,DATE:12/8/17-2:28:40
POW:2.00,NODE:1,DATE:12/8/17-2:28:40
POW:3.00,NODE:2,DATE:12/8/17-2:28:40
POW:4.00,NODE:3,DATE:12/8/17-2:28:40
POW:5.00,NODE:4,DATE:12/8/17-2:28:40
POW:6.00,NODE:5,DATE:12/8/17-2:28:40
POW:7.00,NODE:6,DATE:12/8/17-2:28:40
POW:8.00,NODE:7,DATE:12/8/17-2:28:40
Here the labels mean the following
VOLT:13.65-VOLTis dc voltage and the value followed by:is the voltage in volts. Similarly,AMP,POW,ENERGY,CHARGEare for dc current, power, energy and charge respectively.NODE:0- indicates the node number. This can go from0-7for dc systems and0-5for ac systems.DATE:12/8/17-2:28:40- indicates the date and time.
Extracting/copying data from HEM data dump
HEM Data Dump - HEM stores all the electrical data in a file data.csv in /media/card. This file is usually hundreds of megabytes. Copying the entire file for a small amount of specific data is unreasonable.
This tutorial shows how you can copy specific information from the data dump for your app. Three examples will be demonstrated.
- Only voltage data of all nodes for 2 days
- All electrical data of all nodes for a week
- Only power data of all nodes for 1 day
Open file.py to follow along
To copy one day’s worth of data from sample.csv (you can replace this with /media/card/data.csv) into a new file
oneDay.csv:
cmd = "grep -e '10/1/17' ../data/sample.csv > ../data/oneDay.csv"
'10/1/17'- the date of interest/data/sample.csv- this is the source file (for this demo). If you want the actual data dump, replace this with/media/catd/data.csv/data/oneDay.csv- this is the destination file
Execute the command
result = subprocess.check_output(cmd, shell=True)
Check if your new file was created
fileExists = Path('../oneDay.csv')
if(fileExists.is_file()):
        print 'file exists'
Copy one day’s worth of voltage data
The command
cmd = "grep -e 'VOLT.*10/1/17' ../data/sample.csv > ../data/oneDayVolt.csv"
The search should satisfy both date and data type. Here the electrical data type is VOLT
Execute the command
result = subprocess.check_output(cmd, shell=True)
Check if the file exists
fileExists = Path('../data/oneDayVolt.csv')
        if(fileExists.is_file()):
                print 'file exists'
Copying one week worth of all data
The command
cmd = "grep -e '10/[1-8]/17' ../data/sample.csv > ../data/oneWeek.csv"
Execute the command
result = subprocess.check_output(cmd, shell=True)
Check if the file exists
#Check if the file exists. This is to make sure the file was created
fileExists = Path('../data/oneWeek.csv')
if(fileExists.is_file()):
        print 'file exists'
KnowledgeBase
Integrating other devices with EnerGyan
Connecting to a 3rd party device directly through wired or wireless channel
When you have other Internet devices that you’d like to connect to EnerGyan, you can use the following architecture. This can be useful for smart homes and sensor projects.
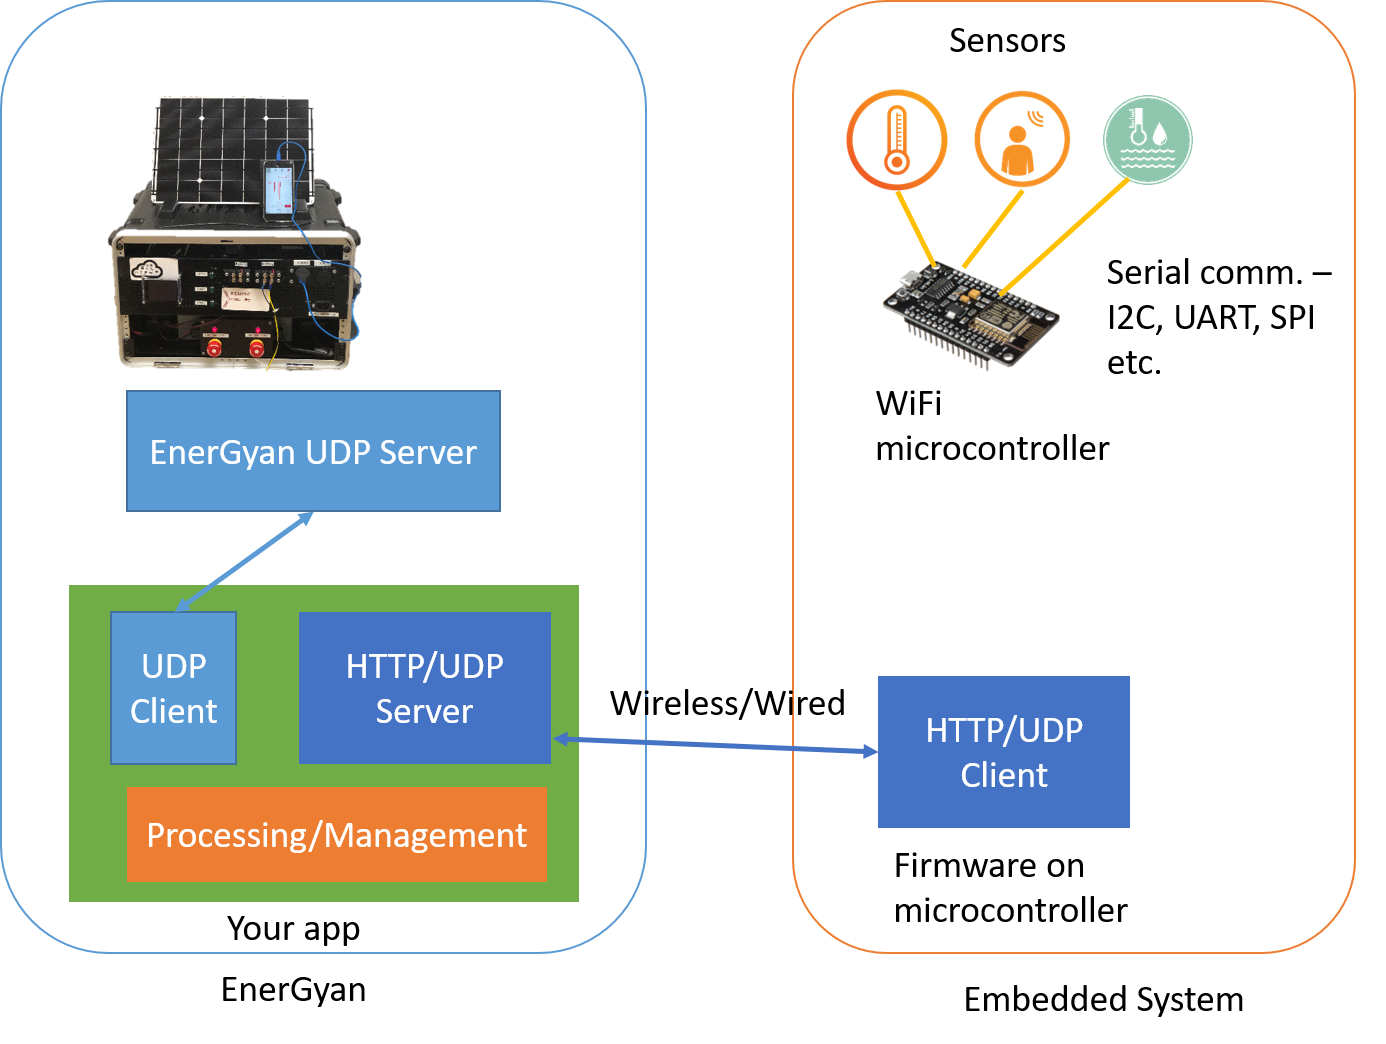
Connect your sensors or other peripherals to a WiFi micro-controller (or add a WiFi module to an Arduino) through serial communication. You can also use single board computers (SBC) like Raspberry Pis and Your app on EnerGyan has two components.
- The first component is the UDP client which talks to the EnerGyan server.
- The second component is the HTTP/UDP server which communicates with the micro-controllers.
- You can add other components such as processing, management and intelligence units.
When should I use this architecture? This is can be used when the post processing sensor data is lightweight. EnerGyan on-board computer is not suitable for running high-end image processing or graphics related apps. It works well for low-end sensor data and communication.
What’s the role of EnerGyan in this architecture EnerGyan serves as the energy system and a computation unit. For example in a smart home project, the input from the sensors (embedded system) is used to manage the energy system (EnerGyan). For example, you can turn off loads
Connecting to a 3rd party device through an intermediate device
When you have Internet devices that you would like to connect to EnerGyan through an intermediate device like your computer or powerful single board computers (SBCs). This configurations is when post processing of data from these Internet devices requires huge computing resources.
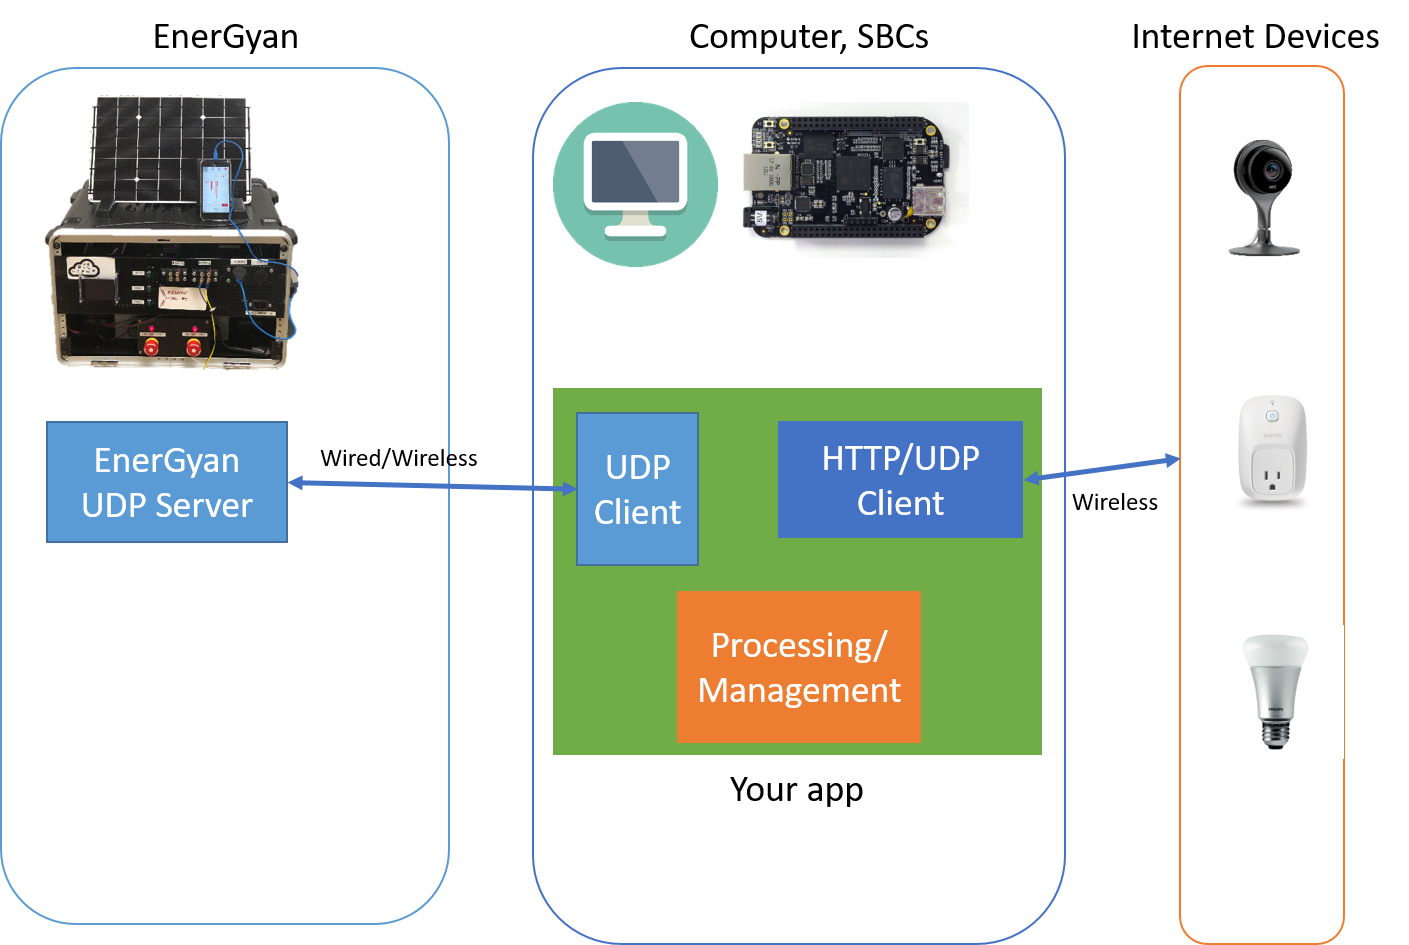
Connect your Internet device (like NEST camera) to your network. Other devices on this network are EnerGyan and your computer.
- Your app runs on your computer. It has three components - UDP client, HTTP/UDP client and the processing unit.
- The UDP client communicates with the EnerGyan platform to send and receive data/actuate nodes etc.
- The second component of your app is the HTTP/UDP client which is pulling data from the Internet Device.
- The third component (processing unit) can process the data from the Internet device (for example processing the images from NEST camera) and then based on that manage your energy system through the first component (UDP client)
When should I use this architecture? This is can be used when the post processing sensor data is intensive. For example, image processing is one example.
What’s the role of EnerGyan in this architecture EnerGyan serves as the energy system. For example in a smart home project, the input from your smart devices like Echo, NEST cameras can be processed on your computer and the result of that can be used to modify your energy system (EnerGyan)